
Blog
Using Cura with the AXIOM Direct Drive 3D Printers

May
New users will benefit the most by utilizing the AXIOM’s default slicing platform, APEX. This is due to the years of testing and refinement Airwolf 3D has put into this software, making the AXIOM user experience as streamlined as possible. While APEX is a fantastic platform and recommended by Airwolf 3D, other slicing software can be used.
Cura has some features that some users may be used to, especially if they use a multitude of other 3D printer brands and are accustomed to Cura. This may help if the user wants to stick with one piece of software that will work with all of their machines. While this is good for some users, it isn’t for everyone, and using other software may make things more difficult.
To help with the transition from APEX to Cura, or if starting out with Cura, Airwolf 3D has created this guide to help you install the latest version of Cura, set up your machine within the software, and import proper settings for your machine. Follow the steps below to set up your AXIOM or AXIOM Dual Direct Drive 3D Printers with Cura. The installation will work the same way with both of these machines.
STEP 1: DOWNLOAD the latest version of CURA Here

Choose your operating system and click DOWNLOAD NOW.
STEP 2: INSTALL CURA
Double-click on the download. A message will appear asking if you would like to allow the app to make changes. Click YES. The download will proceed.
On the welcome screen, click NEXT.

Agree to the License Agreement, then click NEXT on the Installation Location screen.


Choose which shortcuts you would like and click NEXT.

The next screen will allow you to select which drivers to install, etc. For printing with the AXIOM series of 3D printers, we only need to check the box next to INSTALL VISUAL STUDIO 2015 REDISTRIBUTABLE if you are using a Windows system, and only if you do not have this installed already.
Leave RUN ULTIMAKER CURA checked and click FINISH.

STEP 3: SET UP CURA FOR THE AXIOM Direct Drive and AXIOM Dual Direct Drive
Cura will start and will set up a default printer. We will need to configure Cura for the machine you will be using. Go to SETTINGS -> PRINTER -> MANAGE PRINTERS.

A default printer will be set up for you, but we will need to add a new CUSTOM machine. Click ADD.

Now click ADD A NON-NETWORKED PRINTER

Choose CUSTOM -> CUSTOM FFF PRINTER, then rename the printer to your AXIOM model in the menu located on the right-hand side of the window. Click ADD.

Under the PRINTER tab, enter the proper dimensions for your printer in the X, Y and Z tabs. The dimensions for your printer can be found below.
AXIOM DD:
X: 344
Y: 230
Z: 254
AXIOM Dual DD:
X: 344
Y: 230
Z: 244
Check HEATED BED.
The following settings will be changed for the AXIOM DUAL ONLY:
Choose 2 under Number of Extruders.

Copy the below START GCODE for your machine model, and replace the default GCODE in the START GCODE area with the copied code by pasting it. Do the same for the END GCODE area. This code can also be found, along with the machine dimensions, in APEX.
AXIOM DD:
;M190 S{print_bed_temperature} ;Uncomment to add your own bed temperature line
;M109 S{print_temperature} ;Uncomment to add your own temperature line
M42 P6 S255 ; turn lights on
G21 ; metric values
G90 ; absolute positioning
M82 ; set extruder to absolute mode
M107 ; start with the fan off
M109 T1 S240.000000 ; heat second nozzle for auto leveling (in case machine selected incorrectly)
T0 ; switch to first nozzle and retract filament
G1 F100
G92 E0 ; set extruder position to 0
G1 E-20 F100
G28 F200 ; home all
G1 Z0 F1200
G1 X20 Y228 F7000
G1 Z-2 F1200 ; lower to brush
G1 X138 Y226 F2000
G1 X40 Y228 F2000
G1 X138 Y226 F2000
G1 E-30 F125
G1 X40 Y228 F2000 ;
G1 Z0 F1200
G28 X0 Y0
M204 S300 ; set accel for probing
M203 Z4 ; set z max speed for probing
G29
M204 S3500 ; set accel back to normal
M203 Z20 ; set z max back to limit
G1 Z5 ; raise nozzle up 5mm
M104 T1 S0 ; cool second nozzle after leveling (in case machine selected incorrectly)
T0 ; switch back to first nozzle
G1 F100
G1 E6 F100 ; extrude filament back into nozzle and 7mm more
G92 E0 ; zero extruder
M400 ; clear buffer
G4 S1 ; pause
M117 AXIOM Printing… ;Put printing message on LCD screen
AXIOM Dual DD:
M42 P6 S255
G21 ; metric values
G90 ; absolute positioning
M82 ; set extruder to absolute mode
M107 ; start with the fan off
G28 F200 ; home all
;M109 T0 S240.000000 ; heat first nozzle for auto leveling
M109 T1 S240.000000 ; heat second nozzle for auto leveling
T0 ; switch to first nozzle and retract filament
G1 F100
G92 E0
G1 E-20 F100
;T1 ; switch to second nozzle and retract filament
;G92 E0
;G1 E-20 F100
T0 ; switch back to first nozzle for auto leveling
G1 Z0 F1200 ; raise bed to Z0
G1 X12 Y229 F7000 ; position nozzles before brush
G1 Z-2 F1200 ; lower nozzles to brush
G1 X148 Y229 F1000 ; clean nozzles
G1 X12 Y229 F1000
G1 X148 Y229 F1000
G1 X12 Y229 F1000
G1 Z0 F1200 ; raise bed to Z0 to avoid contact
G28 X0 Y0 ; home x and y
M204 S300 ; set accel for probing
M203 Z4 ; set z max speed for probing
G29 ; autolevel
M204 S2500 ; set accel back to normal
M203 Z20 ; set z max back to limit
G1 Z5 F200 ; raise nozzle up 5mm
;M104 T0 S0 ; cool first nozzle after leveling
M104 T1 S0 ; cool second nozzle after leveling
;T1 ; extrude filament back into second nozzle
;G92 E0
;G1 E20 F100
;G92 E0
T0 ; extrude filament back into first nozzle
G92 E0
G1 E20 F100
G92 E0
M400 ; clear buffer
G4 S1 ; pause
G1 X20 Y200 F6000
G1 F{travel_speed}
M117 AXIOM Dual Primary Printing… ;Put printing message on LCD screen
END GCODE:
AXIOM DD:
;EndCode
M400
M104 T0 S0 ; switch off first nozzle
M104 T1 S0 ; switch off second nozzle
M140 S0 ; heated bed heater off
M107 ; fans off
T0
G92 E0 ; set first extruder to 0
G1 E-3 F300 ; retract a bit to relieve pressure
G28
M84 ; steppers off
G90 ; absolute positioning
;{cool_code}
M42 P6 S0 ; lights off
AXIOM Dual DD:
;EndCode
M400
M104 T0 S0 ; switch off first nozzle
M104 T1 S0 ; switch off second nozzle
M140 S0 ; heated bed heater off
M107 ; fans off
T0
G92 E0 ; set first extruder to 0
G1 E-3 F300 ; retract a bit to relieve pressure
T1
G92 E0 ; set second extruder to 0
G1 E-3 F300 ; retract a bit to relieve pressure
T0 ; switch back to extruder 1
G28 ; home all
M84 ; steppers off
G90 ; absolute positioning
;{cool_code}
M42 P6 S0 ; lights off

Click NEXT. Your new printer is now set up in Cura.
STEP 4: IMPORT SETTINGS
In order to get the best print quality out of Cura, Airwolf 3D has put together a base of settings for the main materials used (ABS, PC, PLA, etc). It is recommended to start with these settings before making any changes.
To import settings into Cura, click on PROFILES in the Preferences menu. Then click IMPORT.

All of the AXIOM profiles for Cura can be found here.
After clicking IMPORT, choose the profiles which were provided above. You will do this for each profile individually. Click CLOSE after importing your profiles.
Load your model into Cura.
We will not be covering the basic functionality of Cura here, as we assume you are already familiar with it, or you can watch the countless setup and functionality videos on the web to help you.
Position your model, then go to the top right corner of the software window under PROFILE and select the printer profile you wish to use.

Preview the print under the PREVIEW tab located at the top of the software window.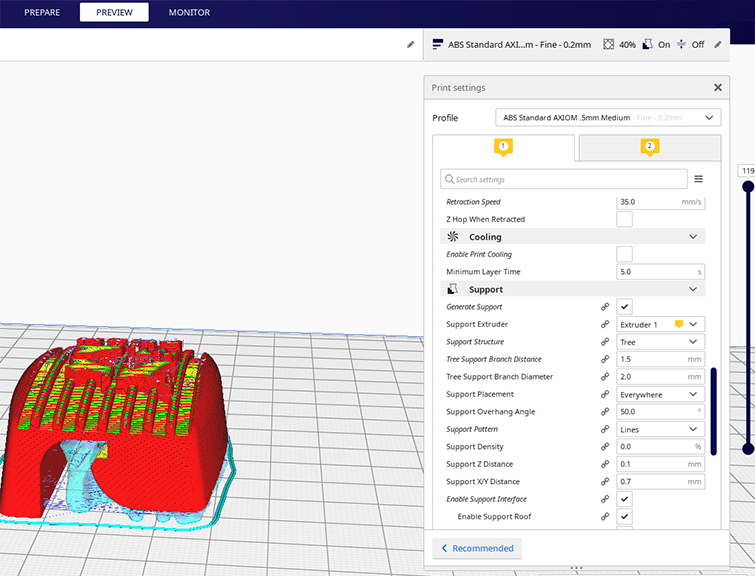
If everything looks good, insert the micro SD card into your computer and click SAVE TO DISK in the bottom right-hand window.

Insert the micro SD card into the AXIOM, preheat your machine, and print.